Thursday, November 29, 2012

Cucumber Cups

Cucumber Cups :) 

For halloween this year, I made these cucumber cups as an appetizer for our party. They looked good, are easy to make and are a crowd pleaser. Great for your vegan and gluten free friends . There are just three ingredients in this dish Cucumbers, Sabra brand hummus and paprika.
Oh, and I forgot to mention I had won a party pack by Sabra and so decided to make something using the hummus. I hope you do enjoy making and serving these cucumber cups to your family.

Recipe:
Seedless Cucumber ( peeled and cut into chunks)
Melon baller
Hummus ( I used Sabra garlic hummus)
Paprika

Once you have peeled the cucumbers, and cut them into chunks, use a mellon baller to remove a small portion from the middle of the chunk and fill it with hummus. Do the same with other remaining chunks. Sprinkle paprika on the hummus to get it a twist. Your appetizer is now ready to be enjoyed.

 Do you have a special easy appetizer, that you love making and your friends enjoy? Do post your comments and feedback, I would love to know what you all think.


Wednesday, October 17, 2012

The "Fruit" Cake

Hey everyone, I hope you guys have been having a great week ! I have been having a good one too. Learning lots of new things, making new friends and getting inspired. I am writing this post for a good friend of mine, who is going to be celebrating her first anniversary on Halloween !!! Well I  hope you guys have a wonderful, blessed and happy life together :). And I was thinking why not start your new year together with something fresh, fruity and healthy .. YES, thats what the Watermelon Cake is all about.

The Watermelon Cake !!!
Before, we get to the recipe I want to share with you something I read online in the local papers. I read this rather sad story about Josh Bridge, who lost his wife in a tragic road accident two days after getting married. It would have been devastating, It made me realize just how precious life is and to value the important people in our life. At once, I was thankful and said a quick prayer for my husband who is first a good friend, support and guide and for my family, my biggest strength and asset. Well, I didn't tell you this story, so that you get sad or emotional, just a reminder to be thankful for all the wonderful people in your life :) ..

Well let's get on with the Recipe now, here's what you 'll need to make the make

1 large elongated watermelon
1 box each of strawberries, blueberries and blackberries.
1 box of edible flowers
2-3 kiwi fruits
1 bunch of mint leaves

First peel off the green skin of the watermelon, you might want to use a sharp fruit knife to quickly cut off the thick green skin. Be careful to do this part, as you dont want to cut out or spoil the shape of the watermelon.

Once the watermelon is peeled completely, cut the ends of the watermelon, so that u get a perfect circular base for a cake. Imagine you are cutting the ends of an egg kept horizontally, you would then end up with a piece which was a thick disk, thats what we'll do to the watermelon as well.

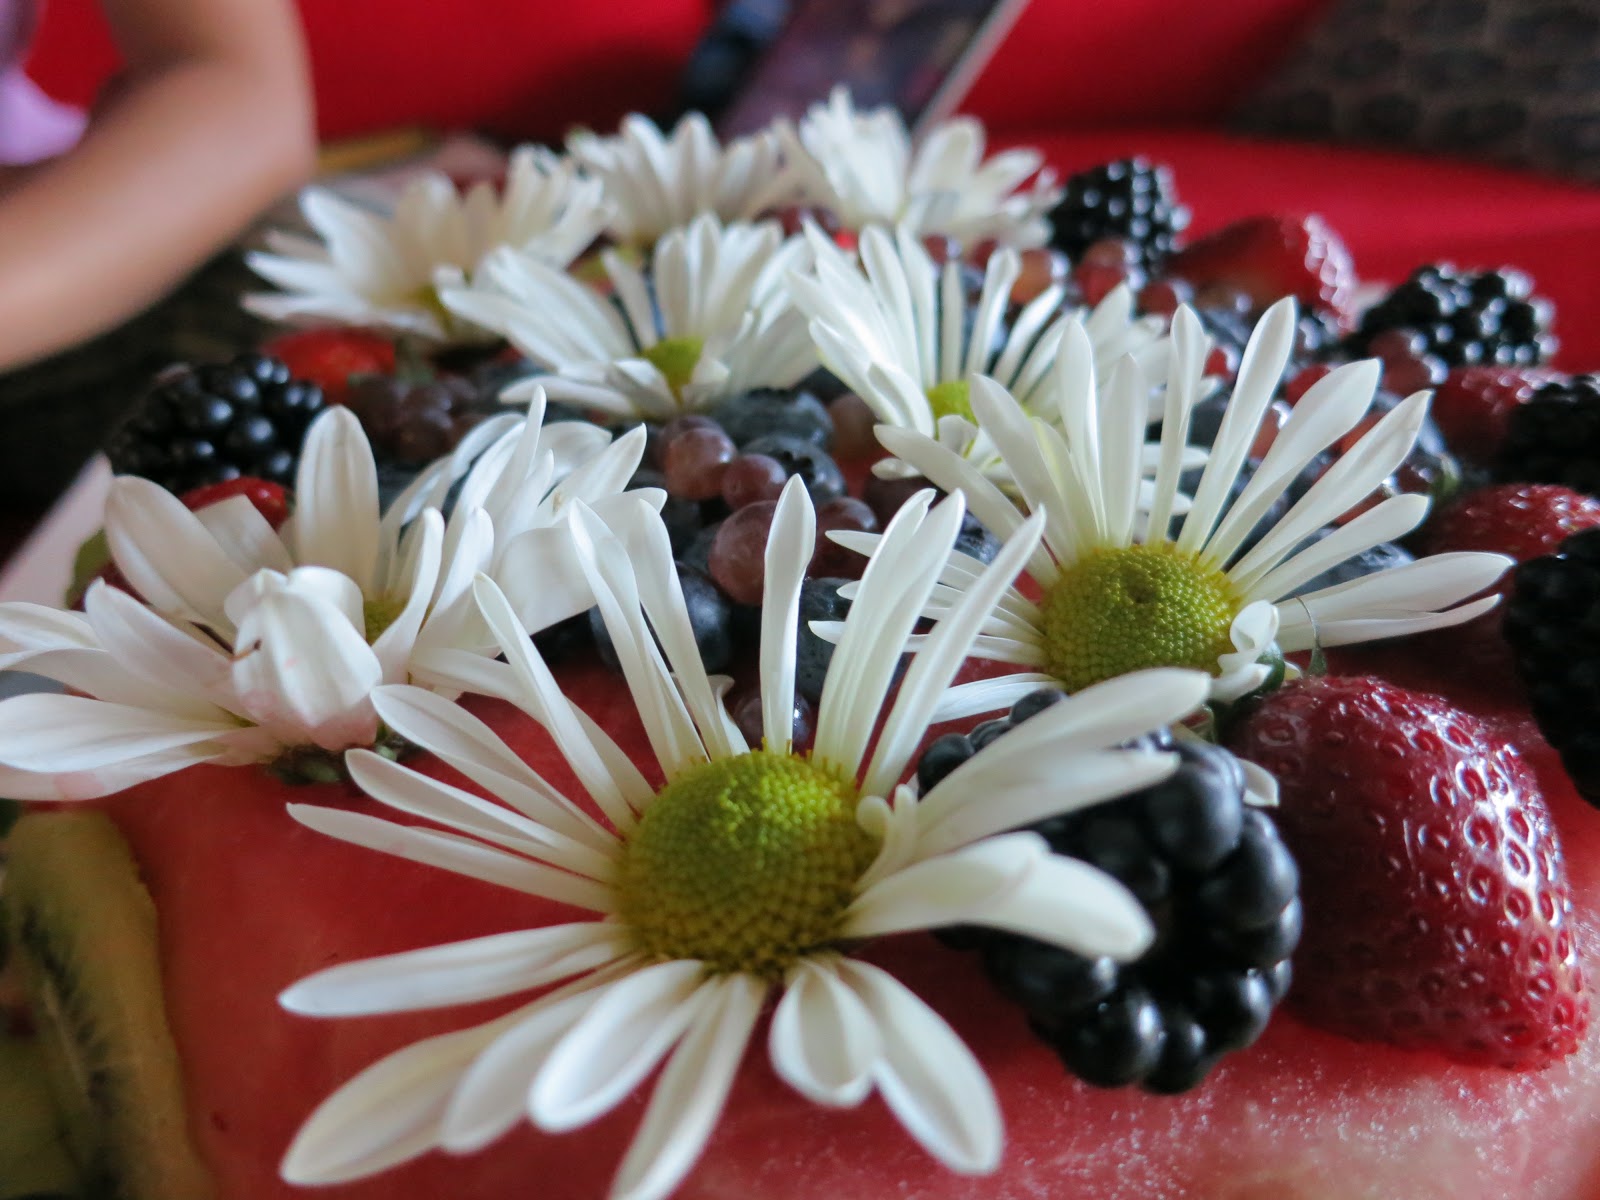
If you have a Pizza pan,line it with silver foil and place the watermelon on it. Line the watermelon with black berries/ strawberries. Place the sliced kiwi fruits on the side of the watermelon. Place mint leaves in a N-S, E-W direction. This is just a guide, loose your fear and explore your creative side. Use the edible flowers to write what you want on the cake, make it fun !!!


You can refrigerate the cake for 4-5 hours and enjoy the cool refreshing watermelon !!! :). I am sure it will be an easy way to impress your friends and family , Enjoy...


The Edible flowers on the cake.


Tuesday, September 11, 2012

Brazilian Truffle - Brigadeiros.


Do you like to make an easy and quick dessert ? Have guests for dinner and need to make something quick for dessert? You should try making these truffles. They not only have a great flavor but will be enjoyed by everyone. I made these yesterday, put them to set in the fridge for 2-3 hours and they are all ready to be scooped and ready to eat. I have adapted the basic recipe for a brazilian truffle and add a bit of twist to it. 

Here's what you' ll need to WOW your friends and family.

Condensed milk - 14 oz. can
Un-sweetened Coco powder - 1/4 cup + 4 Tbsps for rolling.


In a microwave proof bowl add the condensed milk and un-sweetened cocoa powder stir, and microwave for around 1 min on high.
Remove from the microwave, and stir again to ensure the mixture is not lumped and is completely mixed and microwave again for a min. Microwaving the mixture will thicken it, slowly. You can adjust the time from 40 secs to around 1min.
Repeat the process till the mixture thickens, too thick to pour and not too thick to mould.
Cling wrap the mixture and refrigerate it for 3-4 hours until it cools and thickens completely.

To make the truffles, use a spoon to scoop out a small piece, roll it onto some cocoa powder. My hands got really sticky while doing it, so I kept washing my hands often, but if you do have plastic gloves it would help making these.

Serve these in individual candy cups and serve.

I am sure your guests will love these ... ENJOY.

Monday, August 13, 2012

Cottage cheese & veggie skewers

It's been a while since I blogged , the arrival of summer and a whole range of activities to do outside has set me on my sluggish button , so write now all I do is read a book, enjoy the sun and take a lazy nap in the afternoon... What are summers for ;) ???


Well summers also means lots of BBQ's we have had two pool party's already with loads of food and being so filled up with it, that its too hard to leave the comfort of the chair and hit the pool... :D . I made these skewers at one such BBQ and they turned out to be tasty and delicious. These skewers are also a great way to incorporate veggies in your diet and eat them with less oil and more flavor.

Heres what you ll need to get from the grocery store to make the skewers, better yet if you have them at home

2 cups Greek Yogurt
2 tbsp Ginger-garlic paste
3 tbsp onion flakes
1 tsp   chat masala
red chilli powder to taste
1/4 tsp gharam masala
1/8 tsp Cajun seasoning


salt to taste

The reason I said greek yogurt was the marinade will be thick and will stick to the paneer and veggies.

400gms Paneer for around 5 skewer
2 bell peppers ( red, green)
1 large onion

Chop all the veggies into square shaped bites, making sure they are all of the same size so that they cook evenly. Mix all the ingredients with the greek yoghurt to make the marinade.
Once the marinade is ready, rub the paneer on all sides with the marinade and place on a clean plate. Do the same with the bell peppers. I did not marinate the onions as I wanted the sweet and caramelized flavor of the onions to remain. Use a cling wrap to cover the plate with the marinated paneer and bell peppers and refrigerate with 6 to 8 hours.

If you are using an oven:

Set it to broil at around 400F , Place the skewers on a baking plate with a parchment sheet  and spray with a cooking oil spray. And cook for around 10 to 15 mins or till the panner and veggies are browned a little bit.


If you are using a griller:

Place the skewers on the grill , spraying some cooking oil and close the lid of the grill to help it cook faster. Make sure that all sides of the veggies are cooked by turning the skewers round every few minutes.

We cooked our skewers on the grill, they turned out really delicious and we enjoyed our BBQ. I hope you do have a great BBQ and do serve your skewers with some pudina or coriander chutney !!


My next post is yet another great healthy recipe for the summer, using only fruits to make a "Fruit" Cake !!! See you soon

Sunday, June 17, 2012

Yogurt dip with Fava Beans ( Fava Raita)

Summers in Oregon are pretty crazy. This week it went from being rainy and cold to being sunny and hot. Its become so hard to depend on the weather to plan a party or go outdoors. But one thing I do enjoy about the summer-spring season are the arrival of Farmer's markets all across the town. My favorite part of going to one is looking at fresh spring fare and getting know and see vegetables that I have either seen in cookbooks or only heard off. 

Fresh Fava Beans 
On one such visit, I got to see Fava beans, used in middle-eastern cooking very frequently. I got really excited and picked up a bunch of those not knowing, what I was up for. When I went home and researched them I found out how much I needed to put in to enjoy these beans. Though these beans are a lot of work , the sheer joy of eating the fava beans is far greater than the pain involved in cooking them.

This is my favorite way to cook fava, which keeps the natural nutty taste of the beans and also gives a crunchy feel. I made up this raitha one morning to pack for lunch along with some rotis. Its rather easy to cook these in the morning, if you do a little planning the previous night. Here's what you 'll need to make the fava raita.

1- 1 1/2  cups - Greek Yogurt 
2- Serrano peppers  - cut lengthwise into 4 pieces
1 cup shelled Fava beans -( do this the previous night itself)
1/2 onion ( chopped finely)
1 tbsp Lemon juice 
5-6 stalks coriander (washed and chopped finally)
Ground Cumin - to taste
Salt - to taste.

Fava raita
Shell the fava beans and refrigerate them in an airtight box, so the first thing you do when you need to do when you want to cook the fava is, fill a pot with water a pinch of salt and set it to boil. Once the water is boiling add the fava beans and let cook for 5 minutes. Drain the beans and shock them in cold water. Now you can pinch the beans between your thumb and finger and the fava beans will pop out... This is a lot of fun to do. 

In a mixing bowl, add chopped onions, Serrano peppers, lemon juice, salt, ground cumin, fava beans and yogurt. Mix all of this together. If the mixture is too thick add 2-3 tbsp of water to make it easier to mix. Garnish with coriander leaves and your Fava raita is ready to be either eaten with roti or as a dip with your favorite crackers :)..

Fava bean raita
This entry is for Kirthi's and Denny's  " Serve it raw " blogging contest.


Monday, June 4, 2012

C'est Magnifique !!!!

Have u had goose bumps and felt sexy speaking a language. Well, I am sure if you did it must be French. There is something about Paris and France that gives me goose bumps . The language, the food and the culture, so romantic and beautiful.. I have been obsessed off late with everything and anything French. I have been reading a book Lunch in Paris - A love story with recipes by Elizabeth Bard and its one of the best books because it is set in France, has a love story and even better has great recipes !!! Isn't that just "C'est Magnifique !!!"

I couldn help but write about it. In each chapter the author talks about her rendezvous with Pairs, her boyfriend-fiance-husband and with french food. After each chapter follow the tried and tested recipes, my favorite is the Moroccan Mint Tea . I know this is not typical french, but I do promise to cook up some other recipes ( typical french) in a few days. For now , lets get on with the Moroccan Mint Tea

I tried this recipe , after a tiring long hike and I absolutely enjoyed the flavors. Here's what you'll need to make it
2 tbsp loose gunpowder green tea
1 bunch of mint on stem ( 7 to 8 sprigs)
4-5 sugar cubes
2 cups boiling water
Pine nuts to serve
A few drops of orange flower extract (optional)

Place loose tea at the bottom of a teapot. Add some boiling water swish around the pot and rinse the tea. Drain out the water through the sprout slowly. Wash the mint thoroughly, place it in the teapot along with the sugar cubes and add the 2 cups of boiling water. Let it seep for around 5 minutes. In a crystal/glass teacup place pine nuts at the bottom, with a few drops of orange flower extract. I did not have the extract so I made it without, but if you do go ahead and add it, just a drop as it is very strong. Pour your tea high above the glass slowly into the glass. You might want to use a tea strainer while doing this.

I learnt from Elizabeth Bard that pouring tea slowly from high above is not only a gimmick for impressing your husband :), but also this process aerates the tea allowing it cool and release the sweet flavor of the mint.  I did not take a picture of the tea, but I will make it again in the next few weeks and will update soon. But I do hope you enjoy the sweetness of the mint and the crunchiness of the pine nuts while drinking the tea.

As a bonus, I have included a video I found on New York Times today about an American food cart in Paris, I hope you enjoy ( at least in video) the smell, sights, sounds and visuals of Pairs and food.

As the french say Bon Appétit et Au Revoir.. 


Wednesday, May 30, 2012

Spicy Healthy Indian Cookies ( Chai Poori)

After the relaxing long weekend, I cant wait to blog :).. I am enjoying the entire process of cooking, taking pictures , editing and finally blogging. Today's entry is for the Blogging contest by Nags, of the famous Edible Garden and Megha of The Balance Mantra. Before I start off my recipe, I want to say a little bit about Nags, I started my cooking blog because I loved cooking and also to keep me busy . But after reading about Nags and her success with her blog has given me more motivation in blogging and food photography. Thank you Nags for being such a great inspiration!
Spicy baked cookies

Well so when I was thinking about what is the healthy snack I like the most, I couldn think of a lot of things. I like having something spicy and light to go with my evening cup of coffee. This is a recipe of Tarla Dalal, which I have modified just a little bit.

The joys of simple things :)
These cookies ( puris) are easy to make, baked in the oven and really spicy. Here's what you ll need to make them

1/4 cup Bajri flour (Black millet flour)
1/4 cup Jowar flour ( White millet flour)
1/4 cup Irish oatmeal, roasted and blended coarsely.
1/3 cup wheat flour + extra

2 serrano peppers
1/2 inch piece ginger
2 tbsp yoghurt
salt to taste

1 cup palak
1/2 cup dried or fresh methi


Chop your palak and methi and sprinkle salt on top and leave for around 10 mins. The salt will help remove the water, which we will squeeze out and use to make the dough. In the meanwhile, with the peppers and ginger make a paste using a small blender or a mortar and pestel.


Take all the dry ingredients in a mixing bowl, add the ginger-green chilli paste and mix. Now add the palak and methi, with the water removed from them. After you mix for a while, slowly add the water to make a dough like consistency. At the end add 1 tbsp yoghurt and mix into the dough, you might not need more so add 1tbsp at a time. Once the dough is ready you can cover and keep aside for a few minutes.

Cookies ready to be baked !!


Preheat your oven to 360F. Make small balls out of the dough and either roll out or press with the palms of your hands to form small discs. I used my hands as it was easier. Make sure that each disc is of even thickness and not too thick in the center. Place the discs on to a baking sheet and make folk marks on it. Place your discs 2-3 cms apart and bake in the oven for around 20 minutes or until done. They should be a little browned around the edges.

Ready to be eaten now !!!


These cookies are crispy on the edges and soft and chewy in the middle, I really enjoyed their spicy flavor along with some chamomile tea and my favourite book ! I hope you enjoy making these for yourself and your family ! Happy Baking and let me know how they turned out


 As my husband says, " Chai Poori ho jaye !! " .


P.S: I have had butterflies in my stomach while I wrote this blog, have been wanting to write this entry for so long and being so excited about this :) Wohoo finally done : D and supper excited for all of you to read it ..


Cookies, tea and a great book for company, what more can you ask for !!!


Wednesday, May 23, 2012

Strawberry- Rhubarb Pie


I have always walked across these interesting looking pink stalks in the fresh produce section at the grocery, wondering how they taste and what could be cooked with them .. Well I finally picked up a few stalks of Rhubarb hoping to find a recipe to make them. But it was a week and I still had not and they had to go to the garbage bin. So last week when I had a lot of strawberries at home, I finally found something that I would want to try and make - Strawberry Rhubarb Pie.

I have never made a pie before and am not a huge fan of them. But I did want to try making this one, and see how it tastes. I used Debs Recipe from Smitten Kitchen to make this pie. And it turned out great. Here's what you ll need to make this pie.


Pie Filling:

4-5 cups of strawberry ( cored and sliced) - rhubarb ( sliced into small cubes)
1/2 cup sugar
1/4 cup brown sugar
1 tbsp lime juice
1/4 cup quick cooking tapioca
1/4 tsp salt
2 tbsp butter cut into small cubes.

Mix all the ingredients except the butter and keep aside. I recommend you do this while you roll out the pie dough so that, the ingredients are all mixed up and ready.

Pie crust:

2 1/2 cups all purpose flour
1 stick unsalted butter( very cold and cubed)
1 teaspoon salt
1 teaspoon sugar
8 tbsp cold water

Make the pie dough a few hours before you actually get to bake the pie. Here's how you do it,

Put all dry ingredients in a food processor and pulse till the butter is almost pea sized cubes. Remove the mixture in a mixing bowl. Add the cold water 1 tbsp at a time , and make a firm dough. Make two parts of the dough. Mix the dough and knead it till it is firm and refrigerate for at least 2-3 hours. When you remove the dough from the fridge it will be firm, microwave for 20 seconds and it will loosen up. Place the dough on a clean counter surface and knead it for 2-3 minutes and using a rolling pin start rolling. Roll the dough into a 12-inch circle, fold in quarters and transfer it to your pie plate ( 9-inch).

In the pie plate open up the quarters and make sure the pie dough sits evenly on the pie plate without forming any air bubbles underneath. Now, fill with the pie filling. Take the second pastry dough you have left aside roll out a second 11-inch circle, make decorative slits and place on top of the filling.

Make sure you have enough (not too much and not too less) pie dough to crimp and form a decorative pattern. Take a large egg yolk with a tablespoon of water and beat it really well. With a pastry brush brush egg yolk on top of the pie to give it a shiny effect.

Preheat your oven to 400 degrees Fahrenheit and bake for 20 mins, after that lower the temp to 350F and bake again for 20 mins.

The pie tastes best when eaten the next day :).. I loved this pie, though I am not a huge fan of pies. I hope you love it too !!


Sunday, April 29, 2012

Meringue Swirls....


I must tell about the obsession I am having about travelling to Paris, eating french food and about anything French !!! I happened to come across the book " A lunch in Paris" by Elizabeth Bard in the library not hoping to read it as much as I am, but just to skim and pick out a few recipes. But ironically, this is the best book I have read in a long while and what I really enjoyed about it was how the author writes about her experiences living in Paris and how she tasted various food followed by recipes of those dishes. I enjoy reading about the story behind each recipe and the history behind it. Its no wonder that when I read  a blog post on Meringue swirls by Michelle, I jumped up wanting to try them.


Meringues are a french low fat dessert as they are made of only egg whites and sugar. The basic meringue recipe ( I did a little research) has only two ingredients egg whites and sugar ... There are many versions to dress up your meringue either by adding gel food coloring, various flavors ( vanilla bean, coffee, chocolate) or just eat it the simple way ! Well I made mine based on Martha Stewart's recipe. Here is what you will need.

Swirls baking in the oven..

3 egg yolks
3/4 cup sugar
1 vanilla bean or 1 tbsp vanilla essence
pinch of salt
1/4 tsp cream of tartar
zest of lemon
gel food coloring
pastry bags

Preheat oven to 200 F.
Simmer some water in a pan, before you start. In a heat proof mixing bowl, mix the sugar and the egg yolk. Cut the Vanilla bean and scrap the insides and add it to the sugar and egg yolk. I made one batch with vanilla bean and another with vanilla essence, and there was a huge difference. The ones made with vanilla essence had a egg smell while the ones made with vanilla bean were good and did not have any egg smell. Vanilla beans are a bit expensive, so its okay to use vanilla essence. So, once you done with this place the bowl on the pan with simmering water and mix with a beater for 3-4 mins, the sugar should melt completely and the mixture should be white and foamy.

Remove from the heat and add salt and cream of tartar. Beat using an electric mixer on medium high speed until glossy stiff peaks are formed. This should take around 6-7 mins.

Paint three vertical stripes on the inside of the pasty bag using any gel food coloring of choice. Fill with meringue paste and circular shapes using a round tip. Space each meringue 2 cm apart. Bake in the oven for 1.15 mins or more until the top is crisp and not doughy. Let the meringue cool for 10 mins before taking them and storing them in air tight containers.

Though I made them twice, I am not very  satisfied on how my meringue turned out. I hope to make them some time soon and master making these. The entire process of making and baking these was entirely thrilling and so much fun . I hope you have making them, as much as I did !!!!

Thursday, April 26, 2012

A very middle eastern dinner...


I have been wanting and wanting to make hummus now for a very longgggggggggggg time.. you get it right, there are always some recipes sitting there that you want to try but either are too lazy or lack motivation. Hummus has been one of those, so to push myself to make it I soaked a cup of chickpeas the night before so I would be motivated to make it the next day. I don't mean to boast about this recipe, but I must tell you the truth the hummus and pita bread was simply delicious and more importantly easy to make.. At first I didn't know if I should attempt making the Pita or get it from the store but after reading Deb's blog on making Pita bread, I decided on handling an larger task. And It was I must say rewarding and satisfying meal.


Without further discussion for the hummus you'll need

1 1/2 cups ( soaked overnight and cooked) chickpeas
3 cloves garlic
3 tbsp Tahini
2 tsp salt
1 cup water
1/2 tsp paprika
2 tbsp lemon juice
Olive oil for garnishing

Put the chickpeas, garlic, tahini, salt , water and  lemon juice in a blender. Blend until it is a smooth consistency, I like a smooth hummus . Garnish with olive oil , paprika and parsley.

For the Pita bread:

3 cups all purpose flour
2 tbsp salt
2 tbsp instant yeast
2 tbsp olive oil
1 1/4 cup water ( microwave for 40 secs or less so that its warm)

In a measuring cup add the yeast, oil, salt and water and stir. Take the flour in a mixing bowl , add lil of the liquid from the measuring cup and keep kneading, keep doing this until u have a dough consistency. The dough will be a sticky and difficult to handle. Dont worry just keep kneading for another 5 mins. Let the dough then sit for 5-7 mins and then knead it once more for 3-5 mins, then place it in a bowl cling wrap it and leave it in the fridge for at least 6-8 hours before you make your bread. Your dough should rise in this time and become soft and fluffy. When you remove the dough cover it up with a wet tissue and slowly take small lumps of the dough and make small balls , place these balls under an oiled cling wrap.


Once this is done, keep your pan on the stove on medium heat and now start rolling the dough into small circles. You will need to use extra flour to be able to roll as the sides will stick , apply a lil more pressure on the rolling pin so that the dough does not roll back in again.


Once you have the dough rolled out place it on the pan let it cook on one side till you have brown spots or bubbles form and then turn sides. If you have a flame burner then place your bread directly on the flame till it rises. Otherwise you can buy one of those wire meshes that you can directly place on the burner , place
 your bread on it and it will have the same effect as being placed on a burner.


I am so sure your pita bread will rise and you can cut it up and either use it as a pita pocket or just dig in and eat :)..... bil-hana' wa ash-shifa' ( may you have your meal with gladness and health).... Bon Apetite..


Thursday, March 1, 2012

Masoor Dal Soup

Off late, We are trying to have a healthy dinner with soup and salad. I tried this soup out of Tarla Dalal's recipe book and it tastes really good. This soup is very filling as it has dal, rice and vegetables in a pureed form.  To make this soup you ll need

* 1/2 cup masoor dal (orange colored dal)
* 1/4 cup rice
* 1/2 cup  red onion 
* 1/2 cup green capsicum
* 1/2 tomato
* Milk - 1/2 cup
* Water - 1/2cup
* Salt - to taste
* Pepper - to taste

1.Wash the dal and rice . Pressure cook with vegetables in 1 1/2 cups of water. 
2. Once the pressure has reduced, open the cooker and mash the contents using a hand blender. If it gets too thick add water to blend. All the ingredients must be mashed completely.
3. Add the 1/2 cup of milk and 1/2 cup of water now and bring to boil. If the mixture is still too thick then add water to bring to flowing consistency. 
4. Add the salt and pepper according to your taste and enjoy !!!.

We usually have this soup with couscous salad.I will post the recipe for that as well, I have not uploaded any pictures but I will very soon once I get my computer sorted out. I hope you enjoy making this soup :)